Daffy Duck: The Marvin Missions Walkthrought
We’re clearing Daffy Duck: The Marvin Missions on SNES step by step—no frills, just what works. You’re Duck Dodgers here, and Marvin the Martian doesn’t forgive sloppy play. Bake jetpack fuel discipline and smart ammo use into your route—tactics beat panic. Below: exact rooms, turns, switches, and bosses; ideal if you want a hands-on Duck Dodgers walkthrough and plan to scoop up every secret along the way.
Martian Base: opening sections and the first boss
Don’t rush into the lower corridor right away. First, hop up to the ledge above spawn: there’s a tucked-away niche with early ammo and a fuel canister. Drop back down and head right to the first hall with turrets and a low ceiling. Move while crouched and keep a steady fire rhythm: the turrets shoot in bursts with a gap between volleys. In the right corner is a lift platform that only activates after you hit a wall button. The button’s hidden in a thin ledge before the lift—shoot the fake wall to reveal the switch.
The lift shaft leads to a split with three doors. Take the upper-left first: a short corridor with laser grids. They blink in a 2-2-4 pattern (two quick flashes—pause—one long). The cleanest pass is on the second short flash while crouched. Behind the grid is a lever that disables the force fields on the center door. Head back and go through the middle.
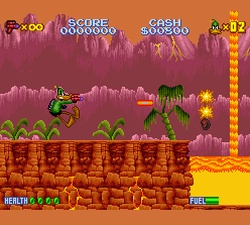
The central section is a long room with hanging platforms and ceiling turrets. Jetpack fuel drains faster than usual here—don’t hold fly; use short taps, hopping platform to platform. In the top-left corner is a sneaky ledge: hover up and pop the wall to grab an extra life. Bottom-right corridor leads to a mini-boss—a shielded security drone. It turns to face you and does a short dash. Stand about half a body away: wait for the dash, hop over, and pour fire in as it turns—three cycles break the shield; a fourth finishes it.
Beating the drone unlocks the right-hand door at the fork. You’ll get a run of tight rooms with ceiling turrets and side lasers. Rule of thumb: turrets always fire first, lasers follow. So the safest entry is immediately after a turret volley. Grab the fuel canister at the end—you’ll want it for the boss.
Boss 1: Marvin in a flying saucer. He runs two scripts: a diagonal wave pass and a hover over center dropping bombs straight down. Best spot is the far right edge. When he sweeps diagonally downward, do a quick jet tap and fire diagonally up; when he stalls over center, slide under the left wall, let the bombs fall right-to-left, then angle shots back up. Don’t waste rare ammo—the basic blaster is enough if you don’t spam the jetpack. Win to open the lift to the next mission.
Planet X: vertical climbs, teleporters, and Martian raids
Start by heading one screen left from spawn—there’s a stash in the crumbled wall with ammo and a heart. Return and go right into a canyon with a rising updraft. The current grabs you once the jetpack nudges it; conserve fuel: hop, give a quick boost, and let the air carry you up almost for free.
Up top you’ll see three color-coded teleporters. Use them in this order: green, then blue, then red. Any other order loops you across two enemy screens and bleeds resources. After red, you’ll land in a hall with four tall pillars. The third pillar has a crack—shoot it, break through, and snag a hidden fuel canister.
The accordion-bridge room: the platform folds and unfolds in sync with the background lights (count one-two-three—pause—one-two-three). Crawl across while crouched, don’t rush; midway there’s a turret below firing diagonally, so the safe spot is directly above it, on the bridge seam. Next is a corridor where Martians pop from hatches in waves. Each wave is a trio: two fast, one slow with a grenade. Let them line up and mow them down; grenades roll along the floor—jump them and save your jetpack.
Mini-boss—a bulky armored Martian. He jumps and tries to corner you. Simple plan: keep half a screen of space, hop under his arc, and tag the head as he lands. After the third clean headshot the armor pops; he gets quicker but softer. When he falls, a door opens in the bottom-right of the arena—don’t miss the stash above the entrance: a tiny ledge with ammo reachable only with a short boost and a wall tap.
Final section of the mission is a long ascent lined with side turrets. Don’t brute-force it. Disable turrets with side switches hidden in niches on the opposite walls at the same height. It’s mirrored logic: left turret—switch on the right, right turret—switch on the left. Make sure to grab the heart midway up—boss ahead.
Boss 2: a pack of Instant Martians. They spawn in groups of five—two waves, pause, then three more. The trick is holding the mid-platform with the small lip. Grenade tosses can’t reach this spot, and jumpers tend to overshoot, opening up perfect shot angles. Don’t chase stragglers—clear only your lane; the rest biff into the platform edges. After the third volley the doors auto-open—pick up the ammo on the left; it sits in the shadow and is easy to miss.
Space Station: grav fields, conveyors, and the core
Entry bay—gravity shift. When the wall indicator glows blue, you’ll feel a gentle pull to the ceiling. Don’t fight it with constant flight—walk and use short boost taps at platform seams. Two screens up is a conveyor belt with turrets. The belt rolls left; it’s easier to shoot from its right edge, where the belt’s drift cancels recoil and your bursts land cleanly.
Double laser-gate room. The gates open via two levers, but not at the same time: left first, then right, and you need to fit it into a single blink cycle. The plan: slap the left lever—short jet through the lower passage to the right lever—hit it—crouch and slide under the upper gate. If you miss the window, don’t try to brute-run the alarm—you’ll get chewed by both shutters.
Before the boss is a long corridor with ceiling magnets. They yank you up if you touch the beam. The dodge is simple: jump—quick tap back—let the beam pass—move forward again. Don’t hold flight or the magnet will swing you into the floor spikes.
Boss 3: the station’s stationary core with armored shutters. Pattern: shutters open left—center—right. Under each section, the floor strip crackles with electricity. Stand at the edge of the safe zone; as a section opens, land three to four precise shots and step back. Between openings, mini-drones spawn—they pop in one hit and appear on a strict timer. Don’t tunnel vision—pick them off on the side while staying ready for the next window. After three full cycles the core overheats—finish it, grab the big fuel drop, and move on.
Final stretch: Marvin’s guard and the showdown
Before Marvin’s lair, you’ll hit a short gauntlet of trap rooms. First—floor segments vanish diagonally. Second—ceiling presses. Third—alternating lasers with mismatched timers. Safer pace is slow and measured: enter—count two blinks—step—crouch—step. Clear the press room in three-step bursts between slams. At the end of the third room, there’s a fake wall to the right with an extra life—the tell is subtle pixel shimmer when you shoot it.
Last mini-boss—a shielded guard mech with rockets. It always fires a rocket pair before dashing. Shoot the upper rocket, jump the lower, and as the mech settles after the dash, drill the chassis. Three cycles to burn the shield, two more to drop the mech. Guaranteed loot—a big heart and ammo; grab everything, then head to the finale.
Final boss: Marvin himself. The arena is two tiers with a center gap. Marvin has three phases. Phase one—he hides behind an energy shield and fires horizontal bursts. Stay on the opposite tier: he leads your current level, and swapping tiers throws off his aim. Between barrages his shield flickers—that’s your tiny damage window. Phase two—drone summons plus bomb runs from above. Don’t fly—kite a loop instead: far left top—drop—bottom right—boost up—repeat the circuit. Bombs drop on a fixed cadence, so you can step them out. Phase three—Marvin goes close-quarters with short lunges and a diagonal beam. Counter with short vertical boosts: hop—two shots down on the diagonal—land—sidestep. Repeat until his sprite flickers—that’s your cue he’s a couple of hits from done.
After the win, scoop up everything the boss drops—the game showers you with ammo and fuel. Handy if you plan to replay sections and clean up missed stashes. For a 100% Duck Dodgers run with all finds, swing back to Planet X for the crack in the third pillar and to the starting Martian base for the niche above the first lift. That patches any resource holes so you won’t need awkward detours next time.
This leg of the walkthrough is all about getting Duck Dodgers to Marvin with minimal losses. Keep the room rhythms, read visual tells, and respect the jetpack—and The Marvin Missions will click into a neat chain of wins.